Hey Y’all!
Jeff here again and something I am really excited about is Watson is now available for anyone to use in Bluemix!
Today we are going to be building an example app using Java, Cloudant, and Watson.
Ok let’s talk through what this app is going to do before we build it.
Meet Ivy (hello!)
She’s a talent manager at a growing tech startup.
She’s looking for a new hire that would be a good fit on her team but the company is so popular that she has a huge inventory of resumes to sort through. She’s looking for tools to help her, and tools beyond just simple tag filters.
With Watson services she can also start to solve for a problem like, “I’m looking for another developer like “[insert cool employee].”
So in this case, the application can issue queries such as,
Find me a Developer like Craig Smith.Then search through all possible candidate and return a ranked list of candidates sorted by highest-to-lowest percentage of personality resemblance. From here, searches can be refined by including technical skills. Find me a Developer like Craig Smith, and knows Java, C and Python.
– Ivy (HR Manager)
Make sense??
Ok let’s jump right in.
Pre-req’s
First thing you need to do is clone the github project with some starter code.
git clone https://github.com/IBM-Bluemix/talent-manager.git
Or download a zip file if you don’t have git installed.
Next we need to complete a couple pre-req steps.
- Download Eclipse EE
- Download and install Java 1.7 JDK
- Download and install the Cloud Foundry CLI
- Sign up for a FREE IBM Bluemix account if you don’t have one yet
Ok once we have all that setup we can start creating our app.
Create the application
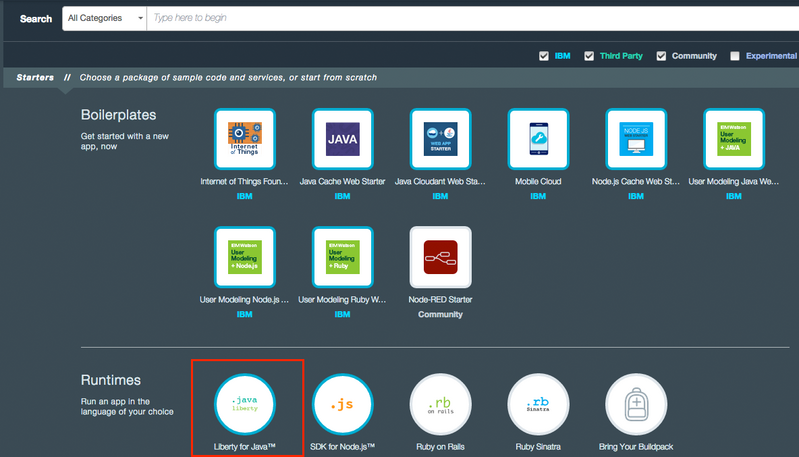
First we need to sign into Bluemix, so open your browser and head on over to Bluemix. We need to login. Up at the top lets go ahead and click on Catalog.
Scroll down a little and click on Liberty
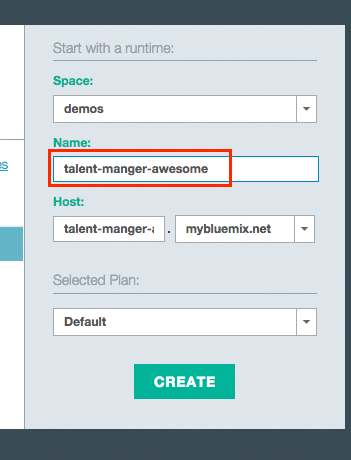
On the right hand side we need to give our app a name. Please note that this name must be unique. Also remember this name as we will need it later…
Click create.
Bluemix will start deploying our app and Bluemix will start our app.
So next we need to add Cloudant and Watson to our app!
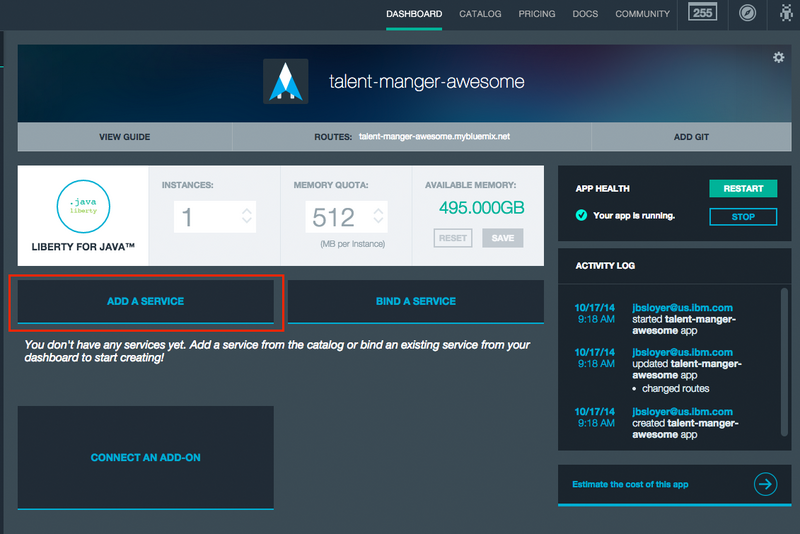
So do you that make sure you are in the dashboard and have your app open like the screencap below. We will then click the “Add A Service” button.
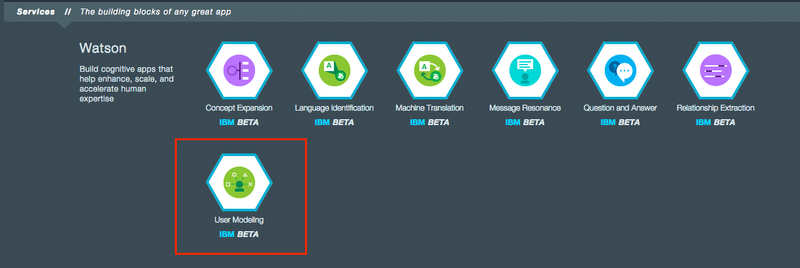
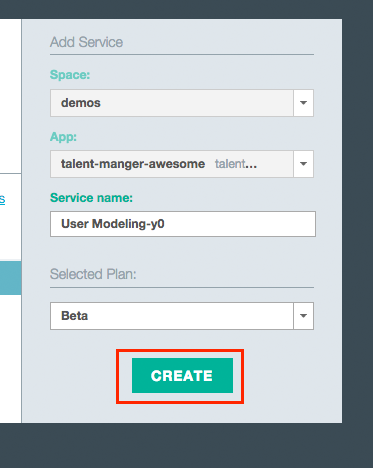
First let’s add Watson. Scroll down until you find the “User Modeling” Service. Go ahead and click that.
Again, all we have to do is click “Create” on the right hand side.
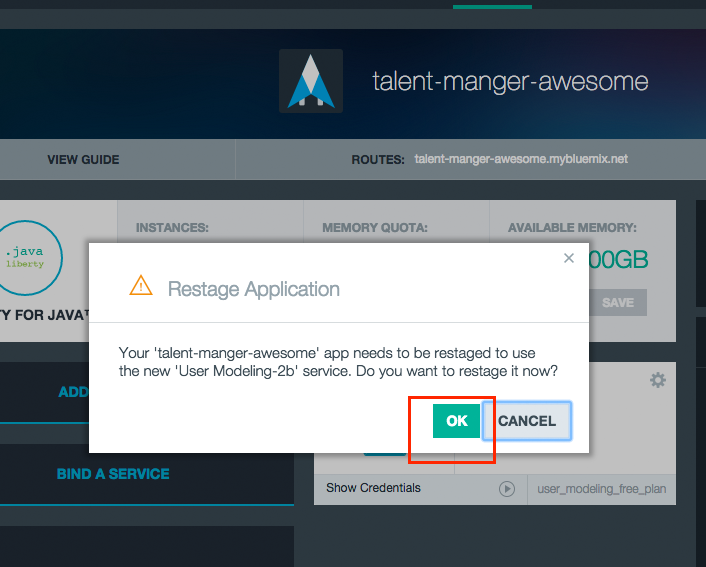
Bluemix is going to ask us if we want to restage our app, we should click the “OK” button. What Bluemix is asking us here is since we made a change to our app, the app needs to be restarted to bind in Watson.
Next, let’s click “Add A Service” again.
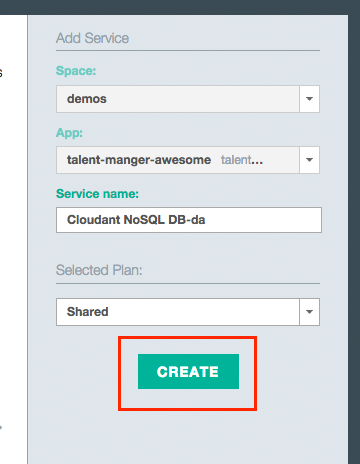
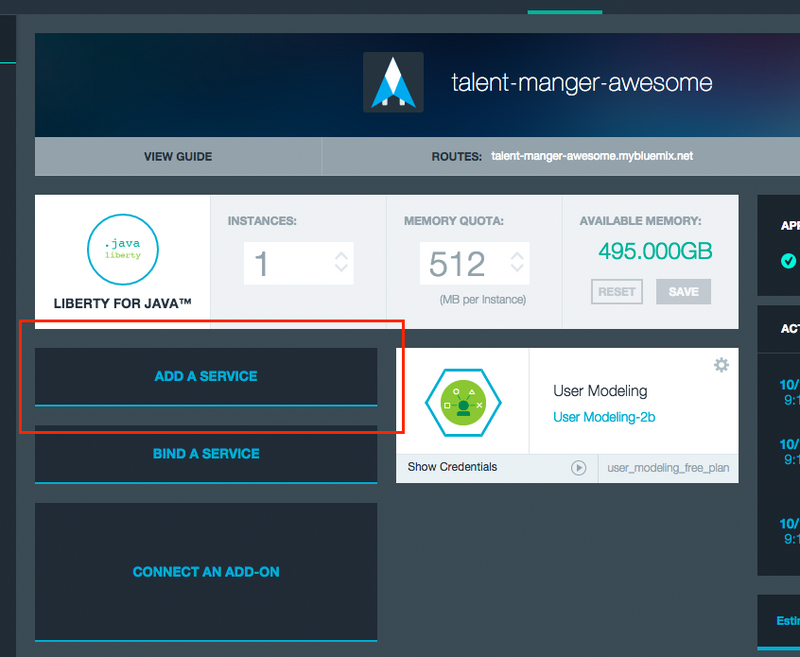 This time scroll down to the bottom and choose “Cloudant”.
Then click “Create” on the right hand side.
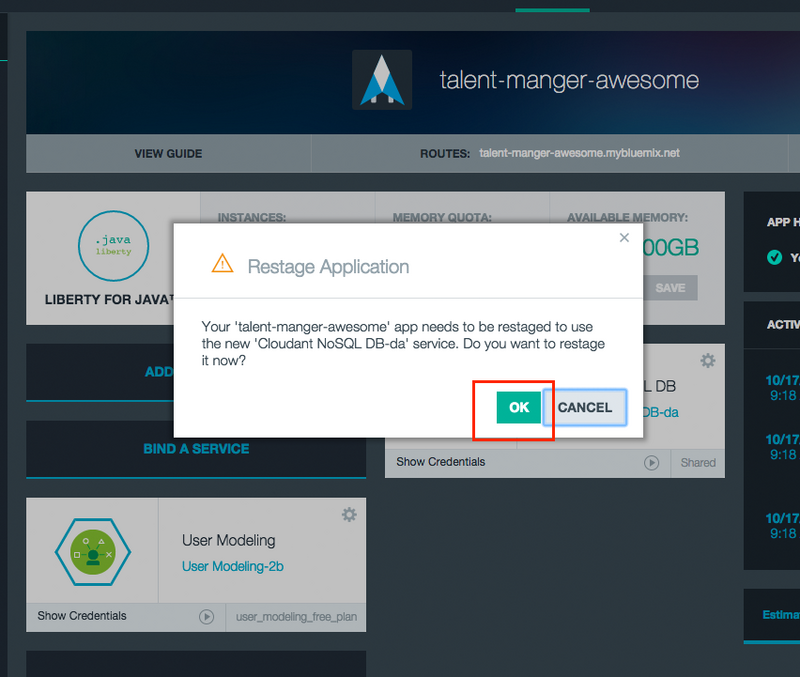
It is going to ask us to restage our app again, go ahead and click “OK”.
Now we have all our services added. Let’s go ahead and start getting some data imported.
On the dashboard for the app let’s go ahead and click on Cloudant.
Explanation of Cloudant
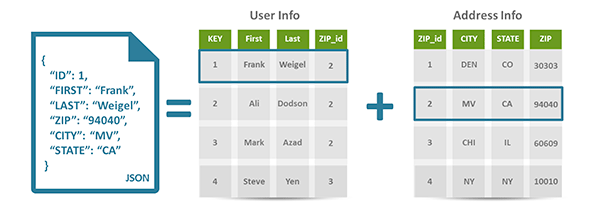
So let’s pause and explain what Cloudant is. Cloudant is a No-SQL database that is based on CouchDB. The big difference between a relationship database and No-SQL database is illustrated below. In the relationship database you have to have multiple tables to represent the data and have to use SQL and JOIN statements to get data from both tables. In a No-SQL database which is commonly referred to as a document store database you stores JSON documents/data (as illustrated on the left below).
So back to the demo…
Eclipse Steps
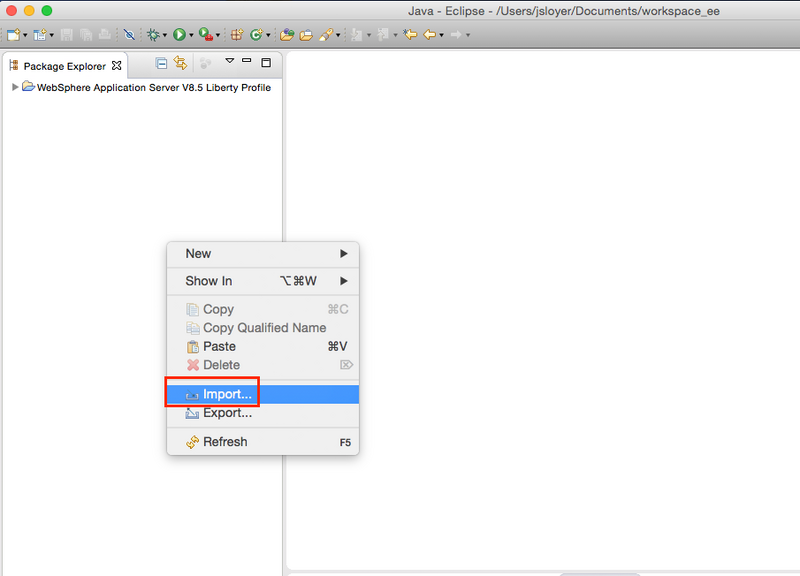
In Eclipse, right click on the project’s area on the left.
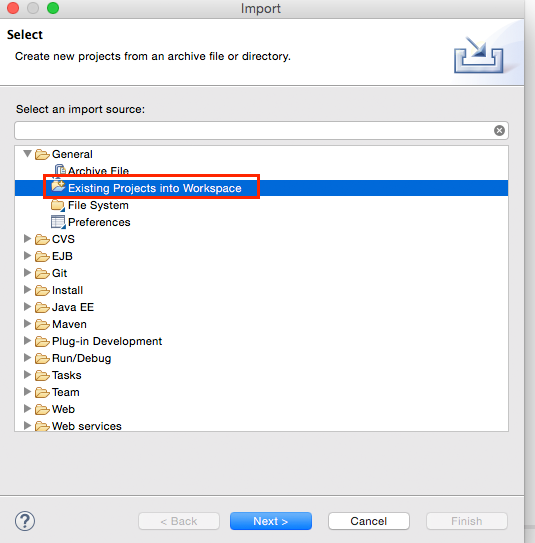
Under General click existing project into workspace and click next
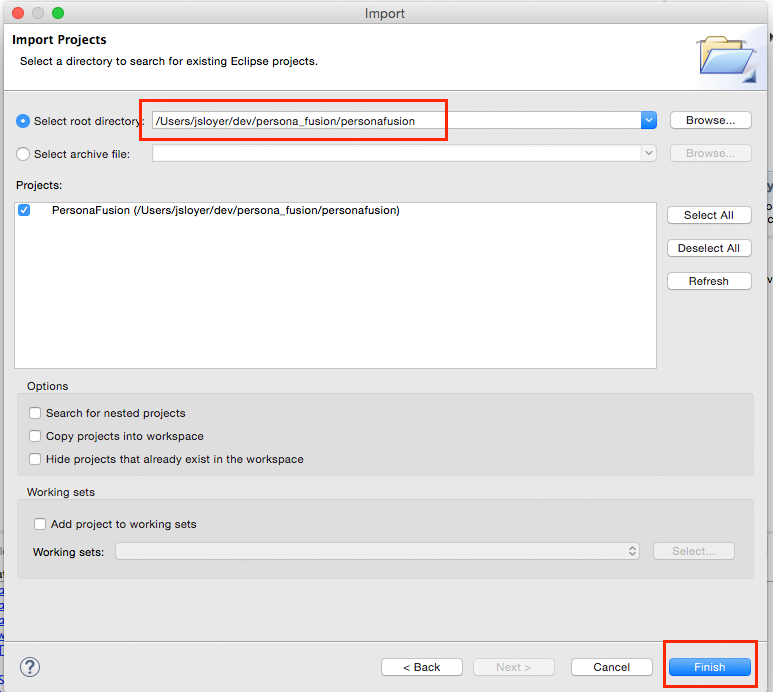
Next we want to find our project we downloaded from github. We need to browse to the directory where it is. Once you find the talent-manager folder, go one more level down into that into a folder called personafusion (as shown below). Click finish.
Next, we need to make a couple code edits…
In src/com.ibm.personafusion/Config.java.
Line 10 currently reads like below.
public static final String CLOUDANT_NAME = "";
It needs to be changed to what is below. This is our Cloudant database name we created. If you used something other than “talent-manager here” type that in.
public static final String CLOUDANT_NAME = "talent-manager";
Go ahead and save that file and close it.
Next open src/com.ibm.personafusion/CloudantClient.java
We need to update our constructor from what is below.
public CloudantClient()
    {
        this.httpClient = null;

        //TODO read env VCAP_SERVICES and parse it into JSON
        this.port = Config.CLOUDANT_PORT;
        this.host = "";
        this.username = "";
        this.password = "";
        this.name = Config.CLOUDANT_NAME;
        this.dbc = this.createDBConnector();
To this.
private JSONArray cloudant;
private JSONObject cloudantInstance;
private JSONObject cloudantCredentials;

  public CloudantClient()
  {
    this.httpClient = null;

     try {
        String VCAP_SERVICES = System.getenv("VCAP_SERVICES");
        JSONObject vcap;
        vcap = (JSONObject) JSONObject.parse(VCAP_SERVICES);

        cloudant = (JSONArray) vcap.get("cloudantNoSQLDB");
        cloudantInstance = (JSONObject) cloudant.get(0);
        cloudantCredentials = (JSONObject) cloudantInstance.get("credentials");
      } catch (IOException e) {
        e.printStackTrace();
      }
      this.port = Config.CLOUDANT_PORT;
      this.host = (String) cloudantCredentials.get("host");
      this.username = (String) cloudantCredentials.get("username");
      this.password = (String) cloudantCredentials.get("password");
      this.name = Config.CLOUDANT_NAME;
      this.dbc = this.createDBConnector();
  }
If you notice we also added 3 global variables as well.
Next we need to update the Watson code as well. This is located in src/com.ibm.personafusion/services/WatonUserModeler.java
Before:
public WatsonUserModeller() {
    //TODO read env VCAP_SERVICES and parse it into JSON
    this.username = "";
    this.password = "";
    this.base_url = "";
    this.profile_api = Config.WATSON_PROF_API;
    this.visual_api = Config.WATSON_VIZ_API;
    this.executor = Executor.newInstance().auth(username, password);
    if (this.executor == null)
    {
        System.err.println("Authentication failed in WatsonUserModeller.");
    }
}
After:
private static JSONArray watson;
private static JSONObject watsonInstance;
private static JSONObject watsonCredentials;

    private Executor executor;

    public WatsonUserModeller()
    {
        try {
            String VCAP_SERVICES = System.getenv("VCAP_SERVICES");
            JSONObject vcap;
            vcap = (JSONObject) JSONObject.parse(VCAP_SERVICES);

            watson = (JSONArray) vcap.get("user_modeling");
            watsonInstance = (JSONObject) watson.get(0);
            watsonCredentials = (JSONObject) watsonInstance.get("credentials");
            } catch (IOException e) {
                e.printStackTrace();
            }
        this.username = (String) watsonCredentials.get("username");
        this.password = (String) watsonCredentials.get("password");
        this.base_url = (String) watsonCredentials.get("url");
        this.profile_api = Config.WATSON_PROF_API;
        this.visual_api = Config.WATSON_VIZ_API;
        this.executor = Executor.newInstance().auth(username, password);
        if (this.executor == null)
        {
            System.err.println("Authentication failed in WatsonUserModeller.");
        }
    }
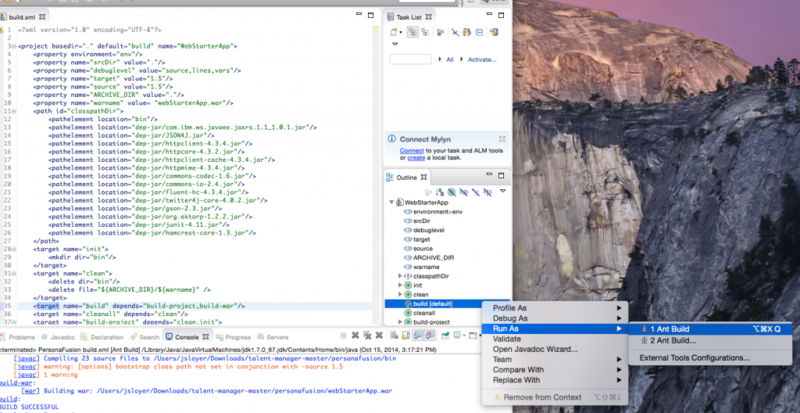
Ok, so the app is basically done, we need to build our war file now, on the left side in Eclipse, open build.xml. On the right hand side right click build [default] and then “Run As” and then “Ant Build”. This will generate our WAR file for us that we will deploy.
In the bottom it should say “BUILD SUCESSFULL”.
The next and last step involves deploy your app to bluemix. This step requires the Cloud Foundry CLI to be installed (if you haven’t done this yet scroll back up the pre-req’s section above).
If you are on Windows open up the command prompt, if you are on a Mac or Linux open up the terminal.
Type the following.
cf login -a https://api.ng.bluemix.net
It will then ask for your username and password that you registered with for Bluemix. There are two important files in this directory.
- manifest.yml
- webStarterApp.war
We need to edit the manifest.yml file and then we can deploy the app.
Open the file in your favorite text editor or you can use Eclipse as well. The contents of the file are below.
There are two important lines in here, host and name. These values need to be unique and match the app we deployed earlier. In my case the app name is talent-manager-awesome, so my file would then become what is below.
This value comes from Bluemix, lets open the Bluemix dashboard in our web browser again. In the screenshot below we can just copy the name of the app and paste this into the manifest.yml file. So don’t copy my apps name exactly as it won’t work, it needs to be your app’s unique name.
Now the final step we need to cd (change directory) in our command prompt or terminal to where the manifest.yml and webStarterApp.war are located. For me its located at /Users/jsloyer/Downloads/talent-manager-master/personafusion.
cd /Users/jsloyer/Downloads/talent-manager-master/personafusion
cf push
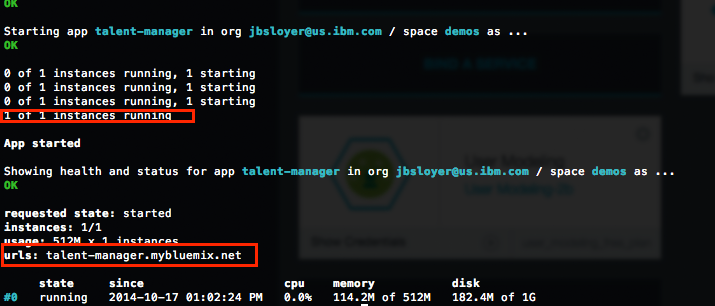
The cf push command pushes our app to Bluemix, a bunch of text will fly bay saying its deploying and eventually it will say the app is starting and then it is up and running. Bluemix will give you a URL you can access your app at.
Voila!!!! We created a Java web app using Cloudant and Watson on IBM Bluemix!
Source Code: https://ibm.biz/talent-manager
Feedback is welcome, please contact me on Twitter @jsloyer – http://twitter.com/jsloyer
For a video walkthrough of this demo please visit http://ibm.biz/talent-manager-demo or watch the video below!
This app was developed over the course of 48 hours at an internal hackathon. The developers and designers that worked on this are the following.
- Eva XIAOHUI LUO
- MICHAEL J. YOUNG
- SEAN J. WELLECK
- BRIAN T. HAN
- MICHAEL POPLAVSKI
- ALAN XIA
- Jeff Sloyer

